Windows 下使用 VS2010 安装 Thrift 框架及 c++ 工程实例
本文的不同之处在于,不借助 Cygwin 或者 MinGW,只用 VS2010,和 Thrift 官网下载的源文件,安装 Thrift 并使用。
本文可用于 thrift-0.9.1.tar.gz,thrift-0.10.0.tar.gz 版本安装。
先从 官网 下载这两个文件:
- thrift-0.9.1.tar.gz
- Thrift compiler for Windows (thrift-0.9.1.exe)
第一个文件是源代码包(包含库文件工程等),第二个可执行文件用于在 Windows 下生成目标语言的代码(用于 thrift 转其他语言代码生成等)。
- 除此以外,还需要 boost 库,libevent 库,openssl 库。
若安装有问题阅读相应 thrift 版本的 README.md 使用推荐版本库安装。
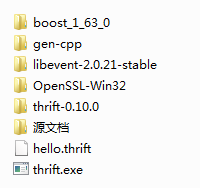
如:c++ 工程下 :thrift-0.10.0\lib\cpp:
安装 Thrift
准备工作
- thrift-0.9.1.tar.gz 源码包(thrift-0.10.0.tar.gz)
- 安装 VS2010(若已安装忽略此步)
- 安装 boost 库,我使用的 boost1.51(boost1.63)版本(官网下载后需要相关编译生成库文件)
- 安装 libevent 库,这里用的 libevent-2.0.21-stable
- 安装 openssl 库(OpenSSL-Win32)可下载编译好的 openssl 库(自己编译需要很多工具,且编译过程问题很多)
解压缩 thrift-0.9.1.tar.gz
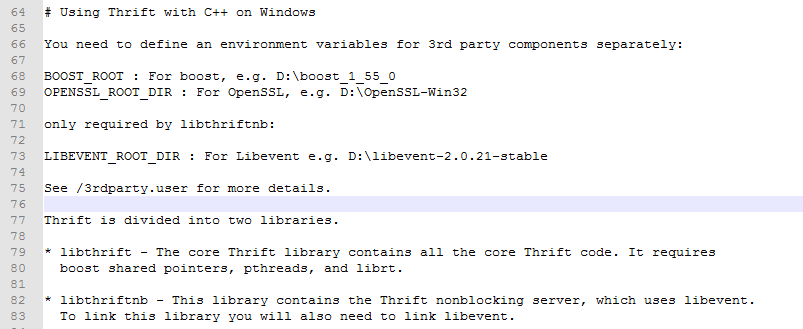
进入 \thrift-0.9.1\lib\cpp,VS2010 打开 Thrift.sln,有 libthrift,libthriftnb 两个工程。
两个工程的区别是,libthriftnb 工程是非阻塞(non-blocking)模式的服务器,非阻塞模式需要依赖 libevent 库。
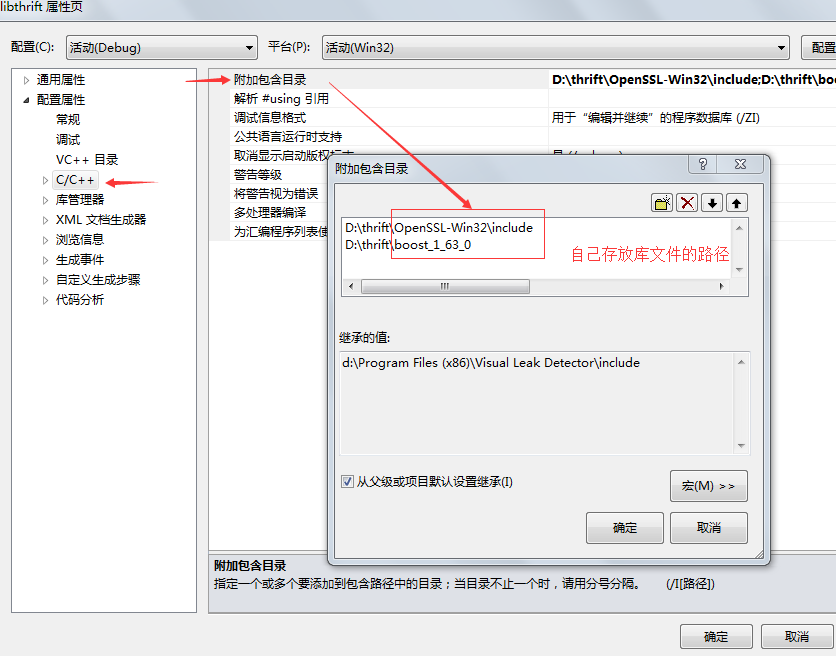
libthrift 工程配置
libthrift -> 属性 -> C/C++ -> 常规 -> 附加包含目录:\boost\boost_1_51
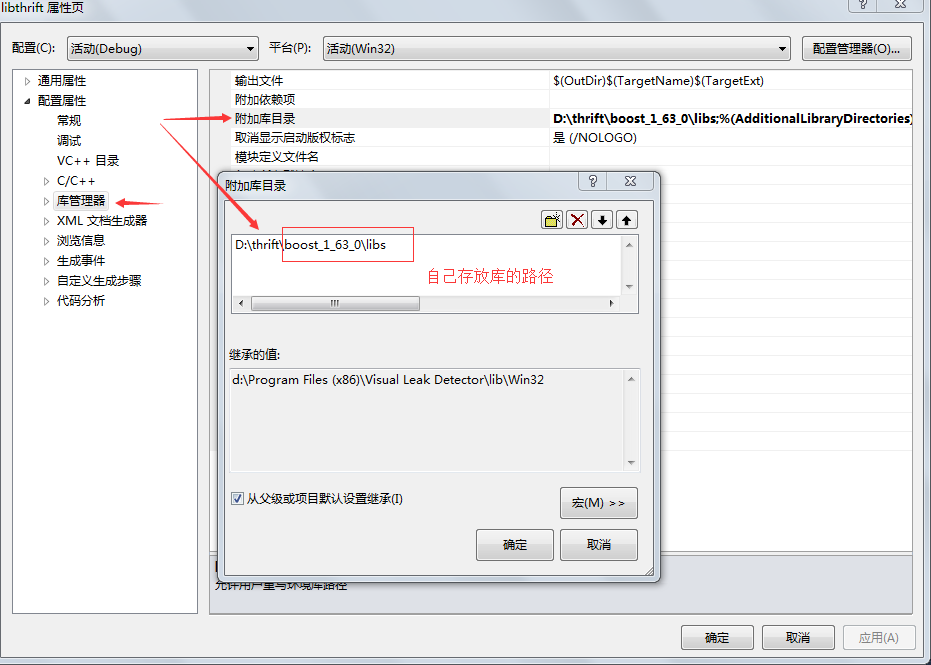
libthrift -> 属性 -> 库管理器 -> 常规 -> 附加库目录:\boost\boost_1_51\lib
若使用 openssl 库,添加相关配置
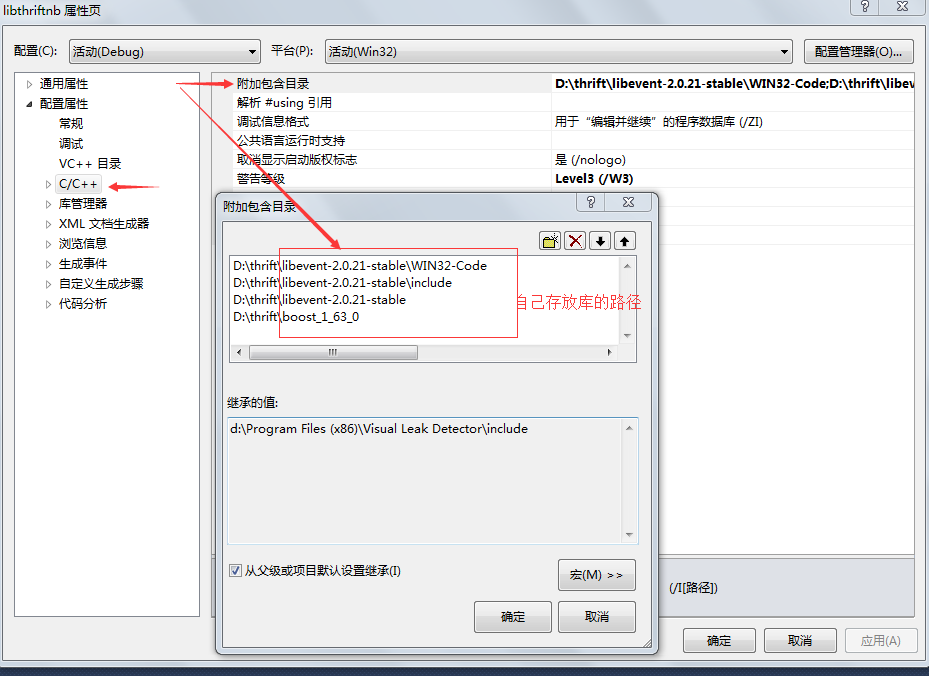
libthriftnb 工程配置
libthriftnb -> 属性 -> C/C++ -> 常规 -> 附加包含目录:
- \boost\boost_1_51
- \libevent-2.0.21-stable
- \libevent-2.0.21-stable\include
- \libevent-2.0.21-stable\WIN32-Code
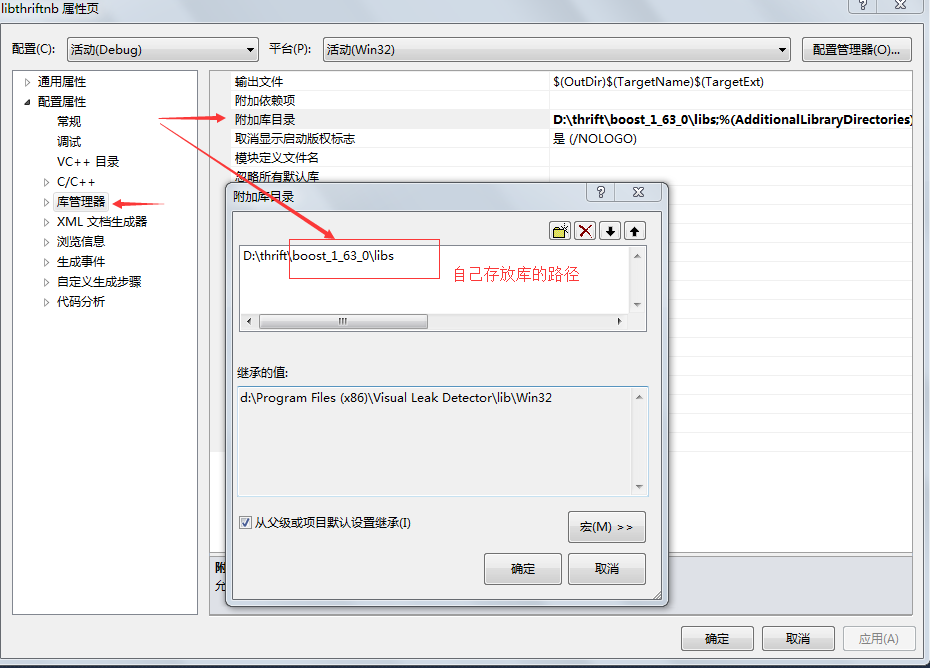
libthriftnb -> 属性 -> 库管理器 -> 常规 -> 附加库目录:
- \boost\boost_1_51\lib
编译 libthrift 和 libthriftnb 工程
- 编译完成后,在 \thrift-0.9.1\lib\cpp\Debug 下生成 libthrift.lib 文件,和 libthriftnb.lib 文件。
- 选择 release 模式,则在 \thrift-0.9.1\lib\cpp\Release 下生成 libthrift.lib 文件和 libthriftnb.lib 文件。
若编译存在问题,可能是工程添加路径文件不对或者某些库文件不存在。
至此,安装完成。
开发步骤
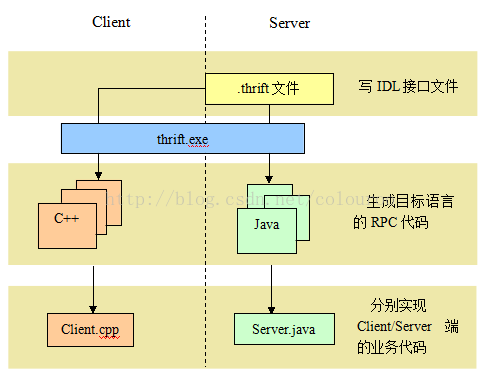
安装好 thrift 后,就可以开始开发了。开发过程分这么几步:
- 第1步: 写
.thrift文件,也就是接口描述文件(Interface Description File); - 第2步: 用 Thrift compiler for Windows (thrift-0.9.1.exe) ,生成目标语言代码;
- 第3步: 服务器端程序引入 thrift 生成的代码,实现 RPC 业务代码。
- 第4步: 客户端引入代码,调用远程服务。
图中蓝色 Thrift.exe 就是从官网下载的第二个文件——“IDL翻译工具”,帮助你把 .thrift 文件“翻译”成目标语言的 RPC 代码。
例子
这个例子,远程 Server 提供一个函数。客户端调用这个函数。远程函数的功能很简单,就是输出 “Hello Thrift”。
写 .thrift 文件
新建文本文件 hello.txt,保存下面的内容后修改扩展名 hello.thrift。
service hello
{
    void func1();
}
生成目标语言代码
把官网下载到的第二个文件 thrift-0.9.1.exe 和 hello.thrift 放到一个目录(hello)下。
打开 cmd 命令行窗口,进入到这个目录,
执行命令:(thrift -gen cpp hello.thrift)
C:\Users\admin\Desktop\Hello>thrift-0.9.1.exe -gen cpp hello.thrift
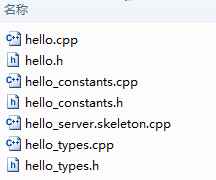
执行成功,在 hello 目录下,生成一个 gen-cpp 文件夹。
创建工程
Visual Studio 2010 新建 win32 控制台应用程序。项目名称 server,解决方案名称 hello。
注意:附加选项中选择 勾选 空项目。类似的,在 hello 解决方案下,再新建一个空项目 client。
为项目添加文件
向 Server 项目添加文件。
复制 gen-cpp 文件夹中文件到 Server 工程,添加到 Server 工程中。
向 Client 项目添加文件。
复制 gen-cpp 文件夹中文件到 Client 工程,删除 hello_server.skeleton.cpp,并额外添加 client.cpp 文件(注意添加库文件 #pragma comment(lib, "libthrift.lib"))。
也可创建一个公共源代码文件(在工程中分别添加进去),最终解决方案的文件结构是这样的:
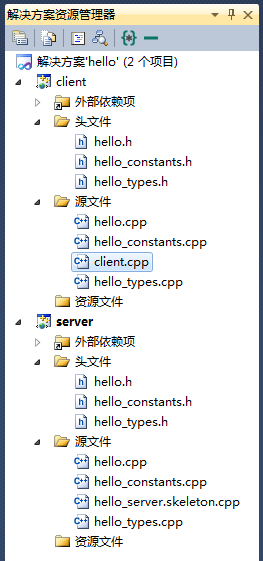
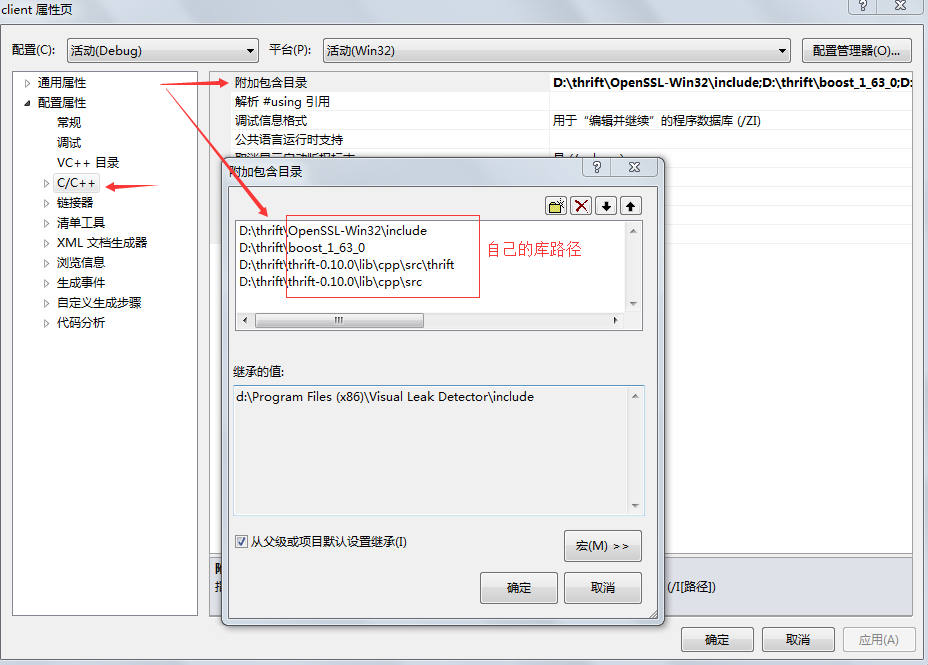
配置项目属性
- Sever工程 Server>属性->C/C++->常规->附加包含目录:\boost\boost_1_51
- Sever工程 Server>属性->C/C++->常规->附加包含目录:\thrift-0.9.1\lib\cpp\src
- Sever工程 Server>属性->C/C++->常规->附加包含目录:\thrift-0.9.1\lib\cpp\src\thrift
- 若使用OpenSSL添加相关路径依赖及引入库文件
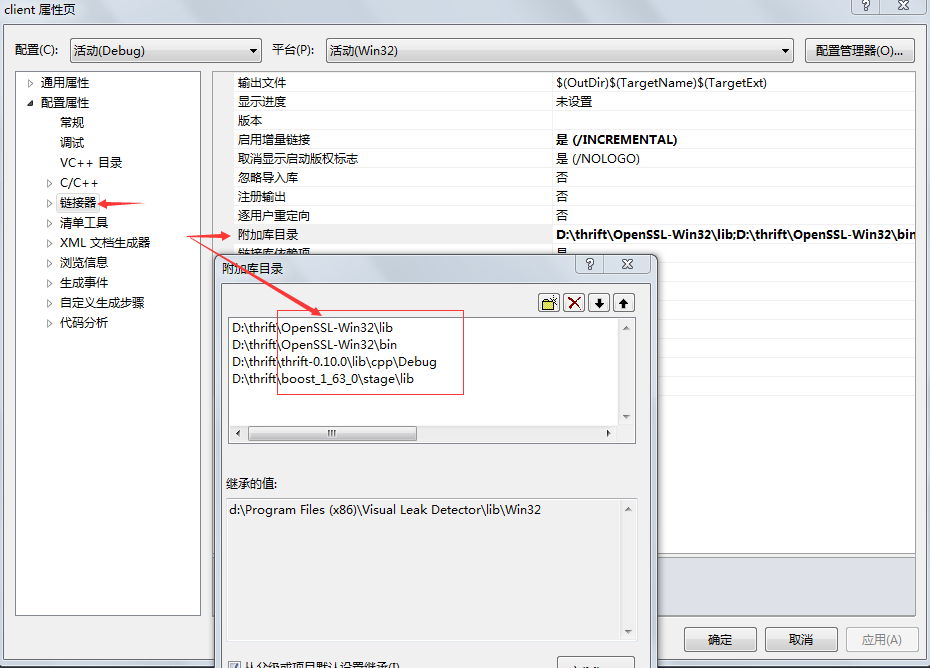
- Sever工程 Server>属性->连接器->附加库目录:\boost\boost_1_51\lib
- Sever工程 Server>属性->连接器->附加库目录:\thrift-0.9.1\lib\cpp\Debug
附加库目录指向的是刚刚编译出的 Debug 目录(此处可将相关库文件放置在你的工程里面,修改附加库目录即可)
类似的,Client 工程也做这样的配置。
- Client工程 Client>属性->C/C++->常规->附加包含目录:\boost\boost_1_51
- Client工程 Client>属性->C/C++->常规->附加包含目录:\thrift-0.9.1\lib\cpp\src
- Client工程 Client>属性->C/C++->常规->附加包含目录:\thrift-0.9.1\lib\cpp\src\thrift
- Client工程 Client>属性->连接器->附加库目录:\boost\boost_1_51\lib
- Client工程 Client>属性->连接器->附加库目录:\thrift-0.9.1\lib\cpp\Debug
Client 代码
client.cpp文件是空的,添加代码:
#include <transport/TSocket.h>
#include "hello.h"
#include <protocol/TBinaryProtocol.h>
#include <server/TSimpleServer.h>
#include <transport/TServerSocket.h>
#include <transport/TBufferTransports.h>
#include <string>
#pragma comment(lib, "libthrift.lib")//链接库文件
#pragma comment (lib, "ssleay32.lib")
#pragma comment(lib, "libeay32.lib")

using namespace ::apache::thrift;
using namespace ::apache::thrift::protocol;
using namespace ::apache::thrift::transport;
using namespace ::apache::thrift::server;
using boost::shared_ptr;

int main(int argc, char** argv) {
    int port = 9090;
    shared_ptr<TTransport> socket(new TSocket("127.0.0.1", 9090));
    shared_ptr<TTransport> transport(new TBufferedTransport(socket));
    shared_ptr<TProtocol> protocol(new TBinaryProtocol(transport));
    helloClient client(protocol);
    try {
        transport->open();
        client.func1();
        transport->close();
    } catch(TException& tx) {
        printf("ERROR:%s\n", tx.what());
    }
    getchar();
    return 0;
}
Server 代码
hello_server.skeleton.cpp 文件已经有 thrift 生成的代码,稍作修改,最终如下:
// This autogenerated skeleton file illustrates how to build a server.

// You should copy it to another filename to avoid overwriting it.

#include "hello.h"
#include <thrift/protocol/TBinaryProtocol.h>
#include <thrift/server/TSimpleServer.h>
#include <thrift/transport/TServerSocket.h>
#include <thrift/transport/TBufferTransports.h>
#pragma comment(lib, "libthrift.lib")
#pragma comment (lib, "ssleay32.lib")
#pragma comment(lib, "libeay32.lib")

using namespace ::apache::thrift;
using namespace ::apache::thrift::protocol;
using namespace ::apache::thrift::transport;
using namespace ::apache::thrift::server;
using boost::shared_ptr;

class helloHandler : virtual public helloIf {
public:
    helloHandler() {
        // Your initialization goes here
    }
    void func1() {
        // Your implementation goes here
        printf("func1\n");
    }
};

int main(int argc, char **argv) {
    int port = 9090;
    shared_ptr<helloHandler> handler(new helloHandler());
    shared_ptr<TProcessor> processor(new helloProcessor(handler));
    shared_ptr<TServerTransport> serverTransport(new TServerSocket(port));
    shared_ptr<TTransportFactory> transportFactory(new TBufferedTransportFactory());
    shared_ptr<TProtocolFactory> protocolFactory(new TBinaryProtocolFactory());
    TSimpleServer server(processor, serverTransport, transportFactory, protocolFactory);
    server.serve();
    return 0;
}
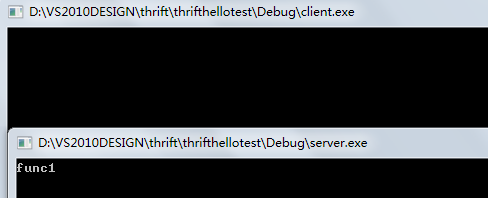
调试运行
先启动 Server 工程,再启动 Client 工程。运行结果:
总结
到这里 Thrift 的安装和开发基本操作步骤就介绍完了。Thrift 的官方文档不是很完善,本篇介绍的安装方法不在网上众多教程之列,主要区别是没有使用 Cygwin 或者 MinGW。
问题总结
编译问题
若在 libthrift 库中不使用 openssl,去除 libthrift 库工程中文件 TSSLSocket.cpp 和 TSSLSocket.h。

若使用 openssl,应用程序工程文件中加载 Openssl 库:
#pragma comment (lib, "ssleay32.lib")
#pragma comment(lib, "libeay32.lib")
否则链接库出错:

Server 工程编译问题
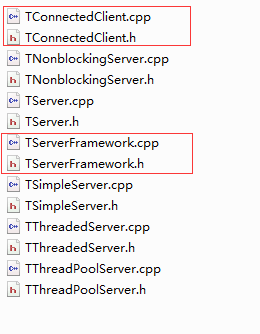
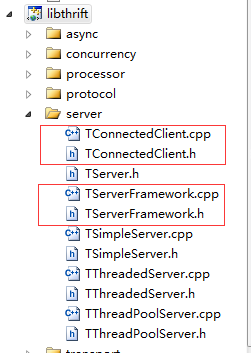
最重要的一步,需要在 libthrift 库工程项目中引入 TServerFramework 和 TConnectedClient。否则你可能会出现这样的错误:

I'm test again to build the lib, find that must be add TConnectedClient and TServerFramework.

路径:thrift-0.10.0\lib\cpp\src\thrift\server
更多编译问题可以到其官网论坛搜索解决方案 https://issues.apache.org/jira/browse/THRIFT-3810